Monday, 28 April 2014

TD- PH1200- Visualising Ideas Blog - Exhibition Review


Photographic Exhibition Review
Tim Hetherington: was a war photographer who delved into the lives of soldiers the amazing thing about his work is how he expresses the contrast of expectations and reality.

We as people believe the army is about strong non emotional men, however we see threw Hetherington’s work the reality, in one set of images he photographed the soldiers sleeping this side of the army isn’t what we see as we always see them fighting.

Tim once quoted “ You never see them like this” what he means by this is when he seen them asleep he had a revelation “They always look so tough… but when they’re asleep they look like little boys. They look the way their mothers probably remember them.” I Find the images very calm and get an innocent emotion from them because the men have their guards down so we can see a very different side to what we expect of the army.

Michael Kenner has travelled the world and the photographs he has produced are something else, I was really intrigued by his images especially the contrast of the images and how bold they are. The majority of his photos were composed in a way I just would not think of doing, this has inspired me to always take more images and look around, play with the different view points, composition and zooms.

Listening to Kenner himself talk in person was more of an inspiration it helped me to get a whole different understanding on photography instead of just looking on the internet and making my own judgement on an image. To hear how and why a photo was taken and his inspirations helped me a lot to look around more look for inspirations instead of waiting for it to happen, also learning how he exhibits his work was an eye opener knowing that he only prints small so it draws the viewer in close making them connect with the image is very clever and I will take note of this for future reference. 

PH1020 - Experimental Practise


Part One - Photobook 

For this assignment I had to produce a photo book with a minimum of eight pages, the theme of the book can be of my choice either something new or extend a previous project I had done, I decided to extend an assignment on dog walkers as I really enjoyed it last time and built up confidence when approaching the public. This time around I choice to use a 35mm film camera as I wanted to explore with different types of photography and also strengthen my knowledge and skills with the area of photography, not only that but as I have already done an assignment on dog walkers I was interested in this time around seeing the outcomes and comparing them to the previous project because I had done it digitally.


To start of with I was unsure on what type of book I was going to create so I took part in workshops that demonstrated how to create and bind your on books for example, perfect binding, concertina books, Japanese stab stitch and five hole pamphlet stitch, by learning how to create these I was starting to generate ideas on the type of book, size and layouts I wanted to 
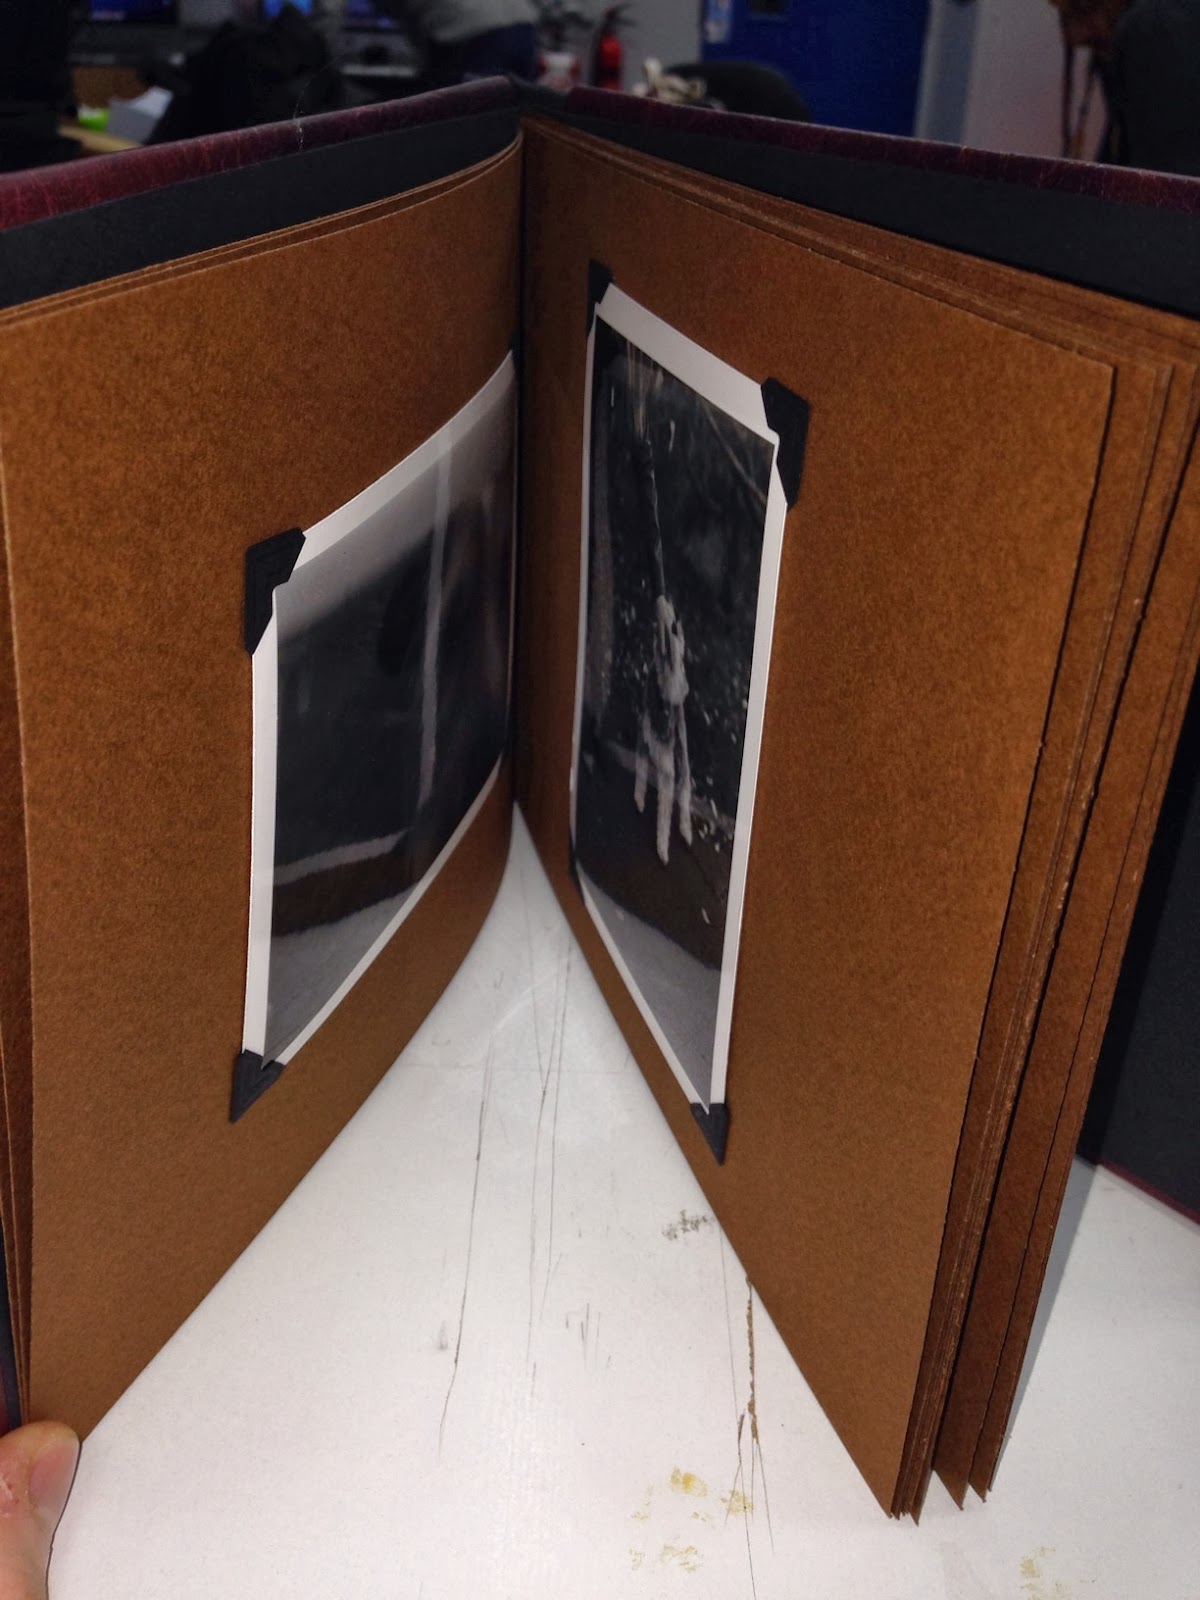
produce. However I came across an old family Photo-Album of my Nans which instantly inspired me, I loved the style and layout of the photos and the album became a big inspiration and drove me to me passionate and precious when it came to producing my Photo-book. The images where in black and white an it made me realise the potential I could get out of using a 35mm film camera.


For inspiration I looked at Eliot Erwitt as he is one of the main photographers who has photographed dogs he was the main inspiration to the previous assignment I had done of dogs. I quite like how his images have a slight comical humour to them and they all have a different character in each photo. I wanted my Photo-Album to have a family vibe to it so by researching on Sue Packer a photographer who creates portraiture of a person and their pet I was able to see different ways animals are photographed, each photo looks like it belongs in a Photo-Album because of the relationship the owner has with the animal. As before I was very formal when it came to taking my photos of the dogs but this time around I learnt to try and loosen up and produce happy accidents and photos that are not all in focus or perfect as my Nans Photo-Album is not perfect many images are either not in focus or the exposure is wrong.


To understand the process of making my Photo-Album I produced a mock up this is to see what my final will look like and also whether I came across any problems that I could change for the better, and I did come across a few errors, the first was I forgot to put a spine in my book so what I would notice is if I had multiple pages in it the covers would start to open and would not sit flat this would be a big problem as I want it too look old but still professional.


Where I had stuck down the leather to the covers I haven’t done a great job on it so what I can see is the edges lifting away making it scruffy and taking away the professionalism of the album. For my final book I will fold the leather and ironed it to make a crease this will make it look professional and stop the leather lifting away once stuck down. I am happy that I have come across these problems as it is all about learning, experimenting and trail and error.


The final set of photos I have created are all quite diverse I took on board not to be so formal when it comes to taking my photos as I wanted them to be snappy and portray some character within them.

One of the strongest photos from the set is of a Shar-pei dog in the distance, what is striking about it is the contrast, I firstly started by experimenting with the different exposure times as I wanted the right tone I found that 2.5 seconds was just right, however I tried burning in the sky and around the image to add mood and more contrast. The inspiration for burning onto my prints was Giacomo Brunelli his images are very strong and bold because he over kills his prints by burning them excessively but they're intriguing and not off putting, what I really like about them are how he uses depth of field drawing the viewer in more to the main subject.


This print is another of my favourites just because of the texture of the dogs hairs and also because of the type of shot it is, the dog is up close investigating myself and the camera creating a nosey character. The texture of the hair was not there to start with it was very flat and greyish, I had to experiment with adding contrast by boosting up the colour magenta I come to the conclusion that 55% was a reasonable amount.

Resonantly I believe I could of added just a bit more contrast to the image to bring out the texture but again not all of my Nans photos in her album are great so it does not bother me so much but I would of liked to experiment more with the contrast if I had more time.


From the set I believe this is the weakest print it lacks character and contrast compared to the other images, I believe it is obvious but I still like the image and that is why I will still include it in the final set. I again experiment with the different exposure times until I was happy I had the right tone, I found that 5.5 seconds was just right but it needed a lot of contrast to make the print acceptable, 50% helped the print a lot but now looking at it I could of tried adding more.

As I really enjoy using 35mm film cameras and developing my own film I will defiantly be exploring more with it in the future but what I have learnt is I need to give myself more time to print my negatives as it can be very time consuming with the trail and errors.

I have enjoyed and learnt a lot with this Photo-Book assignment such as how to create and bind my own books I will carry on making my own books as its a great skill to have especially when it comes to exhibitions, also I believe I became more independent when it came to the dark room I have defiantly built up my skills and confidence and by making mistakes I have only learnt from them.

There is just a few things I would improve about my final photo-Album such as the corners of the book covers, as I have not cut the leather perfect the covers now show the cardboard underneath, this is just a tiny mistake which now I will learn from and when it comes to making more books I will know how to stop this problem happening again.


Also I should of thought of a better material to use for the spine of my photo album, although it looks nice now but because of the material it is over time it will start to get damaged when handled, so again I will experiment with materials that I know will say strong and not get damaged over time, as this is the first ever book I have made I am very pleased of the turn out and have learnt a lot and will take the knowledge and skills and keep progressing.


PH1302- Political Montage


Part Three

For this assignment I had to produce two digital photomontages with either a social or political theme, I started by researching on both Traditional and Contemporary examples of political montages. John Heartfield was an Anit-nazi he expressed his thoughts and views on world war two by using photomontage, photomontage allowed Heartfield to create loaded and politically contentious images.

His images are very powerful and striking, which is what he wants as it gets the viewers attention and the message across, I really like how he has used this technique to get across a strong subject its very clever.


After looking at my research and thinking about what themes I could do for my photomontage I came up with the idea of stereotypical Scouser’s, I collected imagery and organised them onto a Prezi as a sort of mind map. What I hoped to get from Prezi was whilst looking at the collection of images I was to spark up ideas,
My idea is to turn a famous painting or celebrity into a stereotypical Scouser and a Famous Scouser who isn’t the everyday stereotypical Scouser into one.


I gathered photos that fitted around my ideas, The Beatles seemed to be the best option as I would be able to manipulate them a lot and on a comical side it would be funny. I collected photos of The Beatles so I had a variety of images to pick from or experiment with. I did the same for my second photomontage, which will be on The Queen.

I started by manipulating a photo of The Beatles by adding stereotypical features to them such as an Afro, Primark bag, Rollers and the North Face these are iconic and what people know Liverpool people for. On Photoshop I used tools for example the magic tool and the rubber to erase parts of the image I don’t need then using layers to build the photo together.

As one of the features I added to the image had a pop art effect I decided to change my full photomontage so it had a pop art effect, I achieved this by going to filter gallery and using ‘Cutout’. Now the photo has an overall consistent look, which I am happy about, finally I added a well known typical Scouse saying ‘ Dey Do Do Dat Dough Don’t Dey Dough’ I feel this adds to the comical side of the montage.


For my second montage I chose the queen I wanted to make her look like a typical Scouse girl so I manipulated the photo by added rollers and Scouse brows. I feel compared to the first Photomontage this is simpler and not as good this is because I had rushed the idea and never gave myself enough time to experiment. However I believe I still got the concept across but personally I dislike it.


Wednesday, 19 March 2014

D&AD New Blood Awards


The Decisive Moment is where the photographer captures a certain moment in a split second not a half a second more or after because the moment will have past, once it has past you can never recreate the moment again in terms of location and people.

For D&ad brief The Decisive Moment I was to use my own intuition to produce an image that is not disposable but represents a particular moment in time.

I struggled to spark up any ideas because I would always end up with an idea, which involved street photography but this area of photography is very common for the decisive moment so I wanted to stay away from this. I used prezi as a kind of mind map to spread out my ideas and see if any ideas had any potential that I could branch off on, the other ideas I come up with where slow motion and portraiture.

My slow motion idea was to capture water balloons popping and paint splattering but I didn’t have the right equipment, In the future I would like to experiment with slow motion photography, as it looks fun and interesting.

My portraiture idea stemmed from taken selfies and my passion for portraiture, this seemed to be the best option, as I wanted to make it personal, none disposable and interestingly funny. I made a throw away comment to classmates to do funny faces that I had done in the past but I couldn’t visualise them done professionally. It wasn’t until I was told do them because of how good the idea was that I become certain I will do them.


I am very happy with my funny face outcomes and I believe it speaks of the decisive moment because I have captured the movement and character within the models faces. I produced a set of six images in a grid because with the type of images I produced a set works well, but I am aware that the D&ad states one image, which is a shame.  


From the set of photos the image of Ben I believe is the strongest because it represented the decisive moment the most this is from the movement and character in his face. 

Wednesday, 12 March 2014

Experimental Practise - The Historic Process Part Two


Part Two – The Histroic Process

Now I have my digital negatives printed off I am ready to take them into the dark room but before that I had to apply liquid emulsion to water colour paper, this light sensitive emulsion can be applied to a multitude of surfaces, it is important to make sure I have applied an even coat to the paper and sometimes two coats as I found out with some of my prints the detail and colour lacked because of the uneven amount of emulsion.

Using my digital negatives to print is fairly straight forward once the paper is painted, firstly I have to find an average time to expose the light to the negatives so the image can transfer onto the light sensitive paper however this will only work if emulsion to emulsion is making contact.

From my six negatives I wanted to achieve four successful prints but looking threw them I can only find three, I believe if I experimented longer in the dark room I could of achieved a fourth. The image below is my favourite the effect the liquid emulsion has given works well with the subject I have photographed, it is very subtle and soft the colours are not too harsh.


Keeping with the same subject of Poland this image also worked well with the emulsion again it is very subtle and even complimenting the subject it is. I like the minimal detail and strong depth of field.


The third image that worked well is of a building outside Paris Photo I chose to turn it into a negative because of the detail and lighting, strong symmetry and the moon shining over the building made the image eye catching making me wants to experiment with the image.

One print that turned out not as good as the others was of Notre Dame, the reason for this is the liquid emulsion is uneven and the brush strokes are visible making the overall print flat and ruining the print because its destructive.


I have enjoyed working with liquid emulsion and experimenting with the technique and would like to use it again in the future especially with different materials such as wood etc.


Alternative Digital Image


Digital Imaging Part 2

For the Experimental Practice  I have explored with new techniques such as the digital pinhole and digital negatives, I started by creating my pinhole where I used a lens cap using a lens cap means images will be only be pure colour because I have no lens and glass to interfere. Taking a small square piece of aluminum I gentle tapped a tiny hole in the center this is where the light will enter hitting the censer, I then taped it to the lens cap which had a hole where it had been drilled directly in the middle.

I was now ready to go out an shoot I decided to go the beach as the weather was nice but not only that I had to think of a theme that would compliment the colours and outcomes of the images as pinhole produces a more softy outcome that is suitable for landscapes. The project is all about experimenting and that is what I did I took my tripod and shot at different heights and different long exposure times, some shots varied from 30 seconds to only 1.
The outcomes where hard to guess because of the type of technique I was using, without focus and knowledge experimenting is all I could do but I liked the idea of not knowing what I was going to produce.

Out of my final 6 images I have chosen this image is my favourite because the high exposure and no focus washes out parts of the landscape especially the iron man in the centre giving quite an extraterrestrial feel about the photo. I really like the unusual subtle purple colours the pinhole has created as on the day I shot these images the sky was blue and clear. I could say digital pinhole is unpredictable and that’s why experimenting with it was vital because it was unclear what the final outcomes would be.


This is my least favourite image from the set compared to the other five because it has less character and interest, I believe it just looks like a normal but bad portrait the colours are not as vibrant and unusual. I chose to use it in my set of six because it worked and it was coherent but looking at it as a single photo I dislike it. Overall I enjoyed experimenting with pinhole and would like to use it again in the future because depending on the theme and lighting the outcomes are very nice, I would like to use pinhole with a 35mm film camera I believe this would produce a whole different visual aspect and mood to the images.


To create my six digital negatives I started by picking out the best images from recent projects that would work well for being turned into a negative, which will be printing onto transparent film, but firstly I needed to take them into Photoshop to edit.

To change my images I started by going to the curve tool and adjusting the control points, after that I went to adjustments then mode and applied greyscale. The next steps where to invert and flip the canvas horizontal, once applying these settings to all of my images I was ready to print my negatives off and take them into the darkroom to experiment with liquid emulsion.


Wednesday, 12 February 2014

TD -PH1200 - Visualising Ideas Blog - Book review on Nadav Kander


I have chose to do my book review on Nadav Kander, this book shows different elements of his work but I have focused on his portraiture work because I connect more with this style of photography and have taken a great interest in his work. Throughout the portrait section of the book  we can see that there isn’t an obvious theme as he experiments with various compositions, lightings and techniques such as we can see he uses coloured gels quite a lot to add a mixture of lighting to the shoot. In the past when experimenting with different sides of photography I came across Kander and took a shine to his work that used coloured gels, by using this technique I was able to show a persons personality or emotion threw not just there expression but by the colours that I projected onto them. 

Normally I analyse  images from the internet as its a lot quicker and easier then getting a book, but in fact I have found it easier to understand an image as I have a closer connection with them, seeing his work on a larger scale is helpful as I can see up close the colours and detail that make the photo. Seeing a photographers work up close made me appreciate the art of photograph and how simple lighting and certain techniques can make such a beautiful image. 


One of my favourite photos in the book is of Mark Rylance this image is of a simple stance with his body facing forward and his head turned to his left but what I love about the image is how the light catches his eyes making them glossy, this is what stands out the most in the image and I feel without the light catching his eyes this photo would be nothing, by having it black and white it washes away  the mixture of colours making it very calm and innocent the expression on his face Is blank and I get a sense of sadness from it but I feel that I only get this because of it being black and white. 

My least favourite image from the book is Dream Girls where we can see a naked women in the background and a pot of flowers in the foreground, this type of portraiture photography does not appeal to me the photo is rather neutral and dull quite the opposite to the work I am inspired by and know Nadav Kander for, I love photography where the images are visually eye catching and are something special and where I can take time to look at it and build up thoughts. 


Nowadays everyone views images online but books are still important I found it a lot easier and beneficial analysing photos from a book, I have learnt that the internet isn't always the best option and I can get just as much insight into a photographers work by a book so in the future I will broaden my ways of researching.