Monday, 25 November 2013

TD PH1300 Introduction to Photographic Practise


Part Four- Location

The theme I chose for Pairs in day was using depth of Field (shallow and deep) in a lot of my images I have used this technique and found that it is a strong theme to use, I love using it and feel it draws the viewer into the image and adds contrast and empathy. Also fog in the background is another property my four images have in common it reminds me of the work from Todd Hido they have a sense eeriness and lifelessness.

This Image has to be my favourite out of the four all because of the way the fog washes out the Eiffel Tower in the background its a great way to draw the viewer in because the tower isn't defined even though its focused on the image its quite hard to view it unless you’re close up to the image.


I admire the contrast between the old and new in this photograph, the old French style building and windows over power the composition of the shot with the new modern building in the background being washed out by the fog. I believe the image has a strong composition and by using depth of field it just gives the image a stronger finish.


To achieve a great photo I had to think about the composition, the lighting and whether or not too much or too little is happening in the shot, for this image I believe its simple but it works well because I have used depth of field which adds contrast to it, also with the fog sitting over the building in the background it adds atmosphere and a different look to the image unlike on a clear day.


Unfortunately my four image isn’t as great as the other three this is because of the little level of fog compared to the others and that I found the theme on a later date which then made it tough to come up with a set of four photos that had a consistent theme throughout. I have learnt that in future come up with a theme before shooting therefore it makes it easier to focus on the shots.


For Paris at night I took snippets of inspiration from a lot of the night photographers we looked at as a class, I chose to base my night time photos of Paris on Lights and how I can portray Paris at night using a variety of techniques. Robert Adams (Summer Nights) photos are brilliant; he is great at creating a dark empty atmosphere and intensifying the contrast between the black and white. I have taken great interest in Robert Adams work and in my own style but inspired by him I will try to make Paris at night an atmospheric place.

I Shot an image of the street lights in France using the rule of thirds by using this I have made my photo strong to make it even stronger I applied a Cream-tone effect it still has similarities to Black and White like it adds tone and depth to the image and eliminates distractions which helps to emphasize the shot. However I love the way Cream-tone adds a vintage property to the shot it adds to the image making it quite peaceful and beautiful. I believe in this shot I have portrayed France at night in a mysterious way especially with the old style lights that eliminate the street but still keeping a strong contrast in the shot.


I kept with the cream-tone so my Paris at night images had consistency, using long exposure I was able to produce a messy shot that looked great with the street lights star bursting and streams of light from the traffic, I like how sharp the image is and the contrast from the tones that catch the viewers attention.  I have learnt to always take more photos of the same shot just to ensure I get it and to try it in different angles.


My third shot is of St Michael’s canal the textures of the waters relate to the fast motion of the traffic in my second photo they also have reflection of the lights in common both images. Although the canal is fast moving and rapid it also has a calm aspect to it I love the contrast between this and also the strong bold tones of the shot.


Tuesday, 12 November 2013

TD PH1300 - Intro to Photographic Practise Journal


Part Three - Street & Documentary TD


Street photography: can be quite unpredictable, as I cannot control the environment in which I am working in, however sometimes happy accidents happen which ads an atmosphere or a property to the images. “The Decisive Moment” is you anticipate the moment and capture it at the right time, I took this technique to the streets of Liverpool were I had to come up with a set of street photography images that are strong.

My first image is of a girl walking towards bus stations, what instantly draws me to this image is the patterns and repetition of the stations in the background, the dark structure stands out but not too much that it distracts the viewer away from the girl.


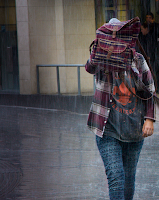
With my second photo it’s a very different scene its of a girl protecting her face with her bag as it torrential rains, what I love about the image is how I have framed and positioned the girl, with the negative space I find it draws the viewer in. I picked to use this image because I feel empathy and a character within it.


I chose to use the man with the saxophone as my third image as the instrument stands out a lot grabbing the viewers attention, its as if the saxophone is over exposed because its so punchy and eye catching. By making the foreground sharp and in focus it throws out the background again making it easier to catch the attention of viewers. I feel that the image is calm and relaxed but in reality it’s completely opposite. 


For my last street photography photo I took an image of a man standing there looking at something, because I haven’t captured what it is he’s looking at it makes myself and the viewers question what is it that’s so intriguing and got him dazing. I really like how he’s standing in the middle in focus wearing vibrant colours making the image more attracting, it also helps that his surrounding are mainly black and white.


Documentary- The Photo Story: With street photography I wasn’t always able to control the environment however with the photo story I was because my subjects knew I was taking photos of them, my story was based around different types of dog walkers in one park (Victoria Park) I had to approach people and ask them questions and get to them and their dogs. At first I was nervous and scared of the reactions I would get but after a few goes I was happy and built up confidence.

I had to take into consideration different elements, which would help me to produce great images that would tell a story, some of these were the Natural Light, Background Viewpoint and Eye Level. By taking them into consideration it had helped me with the compositions and variety of images I was able to produce.


My first image is of a woman walking her two King Charles spaniel in the early hours of the morning I used a zoom lens to capture this image unlike my other images this women didn’t know I was taking photos of her this created a natural feel that isn’t staged. I get a sense that she trusts her dogs and they trust her she’s not even looking to see if they are following her they just know to follow.

Because this image was took in the morning its very calm and cold and I find that because I used a zoom lens it works very well, I love how the floor leads to the subjects which are in focus and the background is blurry drawing the viewer into the centre of the image. The caption for this photo is "Early morning dog walk"


My next photo is of a women with her Great Dane, this is my personal favourite because of how the dog stands in front of the women as if its protecting her, I get a sense of loyalty and pride from the dog. This image works very well because of the contrast between the dog and the owner, the dog stands there big and tall protecting the old timid owner it really expresses the relationship between them.
Caption- "The Proud & Loyal Dog


Another photo that I am happy about is of Sam the dog he is a mixed breed of Collie and Corgi, the more I spoke to his owner the more I got to learn about him, unlike the Great Dane Sam was only interested in his toy he could run around for hours. The composition is quite strong I find
Caption- Sam the happy energetic Mixed Breed


Each time I went to the park to take photos I improved in myself and my photos got better and I built up the courage approach more dog owners, the first time I went my photos weren’t very good I wasn’t on eye level with the dogs so the more I criticised myself and others gave me constructive criticism the better I got. 

Friday, 1 November 2013

TD PH1300 - Intro to Photographic Practise Journal

Part Two - Portraiture 


The Studio Portrait: In the studio I have all the control over the lighting and environment which makes it easy to take photos as its all predicable, my first portrait image is of Brian because the photo is Black and White its very bold and contrasting which helps bring out the detail and I believe character in the sitter I really love the subtleness I get from the photo it really fits well with Brian's personality.


Vintage is one way I would describe my second portrait photo which is of Kiera, I love the old glamours look of the image  it works very well as the sitter is a girl the soft colours compliment her features, it reminds me of old style photos from around the 1920's.


My last photo is again of Kiera this time quite different, unfortunately I don't like this image the Black and White I feel does not work with the individual photo it comes across to plain I don't get nothing from it at first I was reasonably happy with it but overt time I have started to hate it. How ever I do love the way the sitters eyes are glossy catching the viewers eyes.   


The Location Portrait: When creating location portraits there is a lot more to think about than in a studio for example I have less control on the lighting around the sitter and the environment therefore I have to make complex decisions. I wanted my images to both convey a natural look to them and not look directed as I want to show empathy and a bond between myself and the sitter. My first portrait photo is of my mum sitting down in her own environment smoking and playing on the laptop, I just captured images when it felt best this way I no they are not staged. 


In my final photo of my mum I noticed there are mixed lighting this is from the wall lights which project a warm yellow into the room and a cold blue colour from the laptop, I believe the mixture of colours add to the image, I did not set out for that to happen and this is what is nice about location portraits its unpredictable in ways. 


My second location portrait photo is of my friend Ellie who practises gymnastics in her back garden I wanted to make both of my images different to one another. It was important I get the composition right because this can make an image look professional and not amateur, with the final image I chose personally the composition I have used is great making the plant in the foreground blurred really makes Ellie in the background stand out making the image strong. 

The lighting in the image was all natural from the sun, I found that working outside taking images is quite risky because at any moment the weather could change, I had to plan when I would take images of Ellie by in advance checking the weather I found again location portrait is unpredictable.


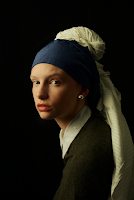
Studio Portrait in the Style of a Classic Painting: To recreate a classic painting using photography is not so straight forward there are a lot of planning and details that need to be taken into consideration, using a photo shoot planning sheet I was able to write down all the important information that is needed to make this happen such as, synopsis, treatment, photographic equipment and resources. This basically gives me a better understanding on what is needed, how the photo shoot will pan out and gives a clear understanding on what it is I am doing.

I have learnt that in this particle photo shoot I will not get out of it a great outcome unless I put the effort and time into planning it, to recreate the painting “The Girl with The Pearl Earring” I used a soft box to cast a gentle light over the face which is mimicking natural light source from a window. In the original image the earring and head scarf are caught by the light this is an important part of the photo that I have to capture or it wont work by carefully positioning the model and the props in the right way I was able to get the outcome I wanted. 


Photographic Paper Invented by William-Henry Fox Talbot


Tony Donnelly


William- Henry Fox Talbot was the inventor of Photographic paper he used silver chloride, which he coated onto paper sheets, by exposing the coated paper to the light for extremely long lengths of time, meant he was able to produce negative images. Washing the images in a fixed chemical solution removed the light sensitive silver enabling the picture to be viewed in daylight without it developing further. 
I believe this was the turning point of photography because by using this technique, which was called ‘Calotype’, meant that printing with negatives means an image could be reproduced however many times was needed. Unlike the Daguerreotype which is the opposite a single image process which is not reproducible. 


Unfortunately ‘Calotype’ wasn’t all that good with the sharpness of an image unlike a metallic Daguerreotype, what Talbot needed was wet collodion process which allowed glass to be used as support without this his negative images were not defined enough, however in 1851 Daguerre died allowing this process to be used refining paper ‘Calotype’. 


Photograms:
When I was first introduced to photograms I didn’t have the knowledge and understanding so I was unsure on what to create and what was the idea behind them. At the time I was grabbing random objects and placing them anywhere on the light sensitive paper and letting the enlarger and light do its job.
Once my photograms where produced all I could see where various objects randomly placed I didn’t see the point, it wasn’t till later on looking at my designs questioning what are they, that It came to me that each photogram I produced told a different story just by the objects I used. I found that they were graphic and abstract this helped with the story telling and because of this each individual person would have a different take on the photograms.
35mm Camera Black and White Film:
What I learnt about 35mm cameras are that they are not so easy to use like digital cameras were you can take as many photos as you want then delete, film cameras are more technical all the setting need to be right for it to take a perfect picture for example the shutter speed needs to line up with the aperture size and the focus needs to be pin sharp. Also using this type of camera is very restricting as I have a total of 36 shots to take in one film so planning and thinking about each shot is important. 
Analogue practise is very time consuming and that processing film is a skill and not so easy unless you know what to do. I first thought printing in the dark room would be fairly straight forward but there is more to it such as getting the right amount of light time to expose the light sensitive paper with, getting this wrong means either the print will be too dark or too light.
To get the right amount of time I had to create test strips increasing or decreasing the light time judging whether the image needs more or less light exposed, by practising with trail an error I started to get an understanding on the process. Every negative I use on the enlarger will need a different amount of time, again by using test strips I will be able to find out. 
To print my images in black and white I used light sensitive paper on this is a paste which contains animal gelatin and silver nitrates it’s this that when exposed to light reacts and changes its appearance to produce the image from the negative. To stop the paper from developing further once in light I had to place it in chemicals, each one played a different part for example- The Developer reacts with the paper developing  the positive print used from the negative film, it is important to agitate the chemical for one minute to keep the process working without agitating the chemical it basically dies and stops working. 
The Stop Bath- works instantly to halt the development on the paper 
The Fixer- works by washing away any left over silver nitrates that may be sensitive to the light, if this step wasn’t done the image would over time darken and fog so it is vital to leave the image submerged in the fixer for approximately five minutes.
Finally washing the image in water removes any remaining fixer which would over time corrode the image, leading to discolouration, staining and fading.
My first final print was of a sculpture and the big wheel in Liverpool I believe It has a strong composition and that is why I chose to experiment with it. I started by using test strips and increasing the exposure time by two seconds to a total of six. I felt that it was too light so I repeated the same process up to a total of eight seconds I believed this was the correct amount of time to use but I couldn’t be too sure because I could not compare it to a more exposed time so I tried another test strip to ten seconds an then found out that eight seconds was the right exposure time to use.


Using the same process again three more times meant I was able to create my other final prints again I used test strips to find out which would be the correct exposure time to use

Direct Positive Paper:
This type of paper is very clever it produces positive prints straight from the 5”x4” camera without the need for a negative,  this paper still requires the same chemical process as my final prints that I developed in the dark room.